Quote from D. Gackenbach
Showing posts with label DIY. Show all posts

Monday, May 20, 2013

It has been ages since my last post.  I have started writing several entries in the past few weeks, but nothing sticks.  So I will keep this short and sweet.  I had a lovely photo shoot with my hubby today.  It came on the heels of a couple other lovely shoots with strangers.  Shooting with hubby has one really distinct advantage over the wonderful seasoned photographers I have had the pleasure of working with recently; I can get my hands on his pictures immediately and do whatever I want with them! bwah ha ha ha ha (uhm, yeah, that is supposed to read maniacal laughter).  So here are a couple of kooky, fun, over edited photos from today.


 Oh, yes, and I made these things, and a bunch of other ones since last post, but I'll talk about that next time...


Wednesday, October 24, 2012

All Hallow's Eve

I LOVE HALLOWEEN!!!  Yep, I am yelling at you, but I must to emphasize my love...
It is a well known fact (if you know me) that Halloween is my favorite holiday.  I do enjoy Thanksgiving, and Christmas gifting is cool, but I friggin' LOVE Halloween!

I love costumes, scary movies, and spooky decor.  Oh, and did I mention my husband and I met on Halloween?  We vaguely know when we got married and make an attempt to mark that anniversary, but in reality we celebrate the day that we met, and this All Hallow's Eve marks our 14th anniversary! We will be decorating, dressing up, and trick-or-treating with our son, 'cause that is how we roll.  So, I thought I would share a sneak peek at our preparations this year.

I've been working on my embalming techniques...

and doing a little tinkering...

now to hide the body, in plain sight!

P.S. to make that wonderfully spooky mummy head I started with the instructions given by everybody's gal pal, Martha (watch the video, she is funnier than I thought).  I made a few changes, first off, I used cheesecloth strips instead of paper towels because I had about a yard in my stash.  Secondly, I didn't glue it, my mummy can be completely unwrapped if I want to save the head (since I use my mannequin for displaying my crafts).  And, finally, I sewed up the eyes and mouth with black yarn and added some plastic flies. 


This is a great centerpiece and I like it so much I think I will sacrifice the mannequin head and spray the entire thing with adhesive to keep it for years to come.  What do you think? 

I will share more pictures of our scary decor and maybe even some costume shots next week.

Thursday, September 20, 2012

Making Faces

Taking pictures of myself always seems like such a weird thing to do.  But it is fun, and I see that I am not alone here in the blogosphere, heh heh heh.  I suppose you could make an argument that we are all just a bunch of narcissists, but I would rather think of myself as a creative girl without a model.  So bear with this creative girl a moment...

I've noticed I find it hard to look at, or rather hard to like, pictures of myself that are not "pretty."  After a lifetime of hearing praise for your looks (which you don't really have any control over, thank you mom and dad) it is hard to let people see you looking "ugly."  I certainly don't look amazing all the time, in fact I wake up looking a wreck most days.  But I digress.  In preparation for Halloween I have been thinking about costumes and today I decided to play with some hair and accessories to get my costuming fix for the day.  I took a couple of really beautiful shots that made me feel sexy and glamorous, but then I decided to make some scary faces for a mummy costume idea.  I am so glad I did.  It is fun to see myself this way, I may not be pretty but I like the look of these anyway.  It feels good.  Go make faces, it feels good, that is all.


Thursday, September 13, 2012

Some Autumn Things

Well summer has finally come to an end.  I am actually glad to see it go, I am ready for a new season and new things.  I love the fall, I enjoy leaves changing, pumpkins fattening, apples falling, and boots!  I adore sweaters and hot beverages by the bonfire.  I even enjoy all the rain I know is headed my way.  But I am getting ahead of myself, for now I will enjoy the early autumn activities of picking blackberries, making pies, and nestling in to my cozy home.

I have been so busy this summer that these first few days of back-to-school feel like just the thing to rejuvenate this mommy.  I have started the final deep cleaning before the cold sets in (it is hard to do this when it gets wet here in Washington, so winter isn't the time to clean).  I rearranged my living space yesterday.  The light is terrible this morning, but here are some pictures anyway.


Last night I lit all the candles and we ate dinner by their light, it was so lovely we decided to let them burn for another hour after we finished our meal.  Perfect way to spend an evening with my boys.

Before I moved to Washington 2 years ago my son attended a Waldorf school.  I try to incorporate ideas from that tradition into our home life because he attends a public school now.  One thing I have been wanting to do is a nature table, but it took reading this great blog post from Tinker Lab to get my butt in gear!  Thank you ladies.  My son is nine, so we can have a wonderful variety of items on our table, including things he has collected (he is really big on rocks).  And underneath I can store some of our games, which seem to have expanded beyond the cabinets ability to hold them recently.


 Along the same lines I also try to keep my son interested in the fiber arts.  He learned to knit and crochet a couple years ago, but it is difficult to keep him interested in these activities.  A few days ago he discovered the Coco the Cat series in Crochet Today magazine, he thought she was the cutest thing ever.  He wanted one so bad I made her up while he was in school Tuesday.  He crocheted her scarf that evening (with much complaining about the difficulty, he was very rusty).  He is very excited about her and wants her to have 100 dresses!  The boy even had the audacity to tell me I should make her a dress a week since I wasn't working on my sweater a month anymore!  From the mouths of babes... so be on the look out for my next sweater, I have a couple that need to be written up, and then I better get back on track for the one a month, I'm being watched!


Wednesday, August 8, 2012

Back to School

This week I have been working on some alterations for my daughter.  I love vintage, and felt it was time she worked a few pieces into her wardrobe (she is beginning her Senior year in less than a month).  She usually wears the usual teenage girl's uniform of jeans and a tank top so this is a stretch for her, but I hope the tailoring helps her see you can make a vintage piece look and feel like it was made for you.

Vintage lace added to the hem of a cute printed skirt
A cute wool skirt taken up to become a mini
And the most amazing pair of vintage Italian jeans!
The skirts were very basic changes, the first one I simply added the vintage lace to the hem with my machine, done in less than 10 minutes.  The wool skirt I took about 6" off the hem and then gave it a new hand-sewn rolled hem, this one took longer, but still used very basic sewing skills.  Both of these skirts could be done by a beginning level sewer.  The jeans required lowering the waist and tapering the legs, but they were so worth the effort.  I think these may be the most rockin' pair of pants ever.  It doesn't hurt that the jeans cost about $5 and then we found $2 in the pocket!  I also did up a pair of skinny purple jeans and a cute little black vest for her, having items tailored to fit you just right makes all the difference in bringing new things into your fashion repertoire- it is hard not to feel comfortable when things fit "just right."

Tuesday, June 26, 2012

SCA Tent?

My husband and I have been discussing the many possible options for a decent, somewhat medieval looking tent for weeks.  There are so many really amazing images of tents floating around the internet that it can become difficult to make any kind of firm decision on a direction to take.  There are custom pavilions selling for hundreds, to thousands of dollars, there are army surplus tents in the same price range, there are instructions for DIY tents, bell tents, A-frames, Viking, Ottoman... it can be a bit overwhelming. 

For us the options can be cut down based on price; we simply cannot afford to spend hundreds of dollars on a tent that we will use briefly each summer.  Because of this we decided to go with a DIY approach.  There are all kinds of wonderful plans available online, SCAdians are great about sharing what works and what  doesn't, but we are taking a slightly different route.  Consider this the first installment of the lazy man's guide (okay, lazy woman's guide if you prefer) to a medivalish family encampment.  We are planning to purchase a 10x20 carport to use as the basic structure of our tent.  These carports can be purchased for around $100.00 and for us this is a very reasonable starting point.  It is the material needed for the conversion that can be very expensive. 

Marine grade canvas, Sunbrella, and similar fabrics can be very pricey.  I have heard about people getting them for as low as $5 a yard, but I haven't seen any myself.  I was planning to save up for a few months to get enough duck canvas, an inexpensive marine option, to create the necessary side panels for our tent.  We basically want to enclose ten feet of the carport to create our sleeping space, and then leave the other ten foot section open on the sides (perhaps with the option of closing in two more sides in foul weather) to serve as a sitting area.  Now, I use the past tense here because that plan changed with a little good luck. 

I found a crazy, amazing, stupid cheap deal on what appears to be marine-grade vinyl.  I say, "appears to be," because this fabric has no information on content, or thickness, or anything, but it was so cheap I didn't really care.  "How cheap?" you ask.  Brace yourself...


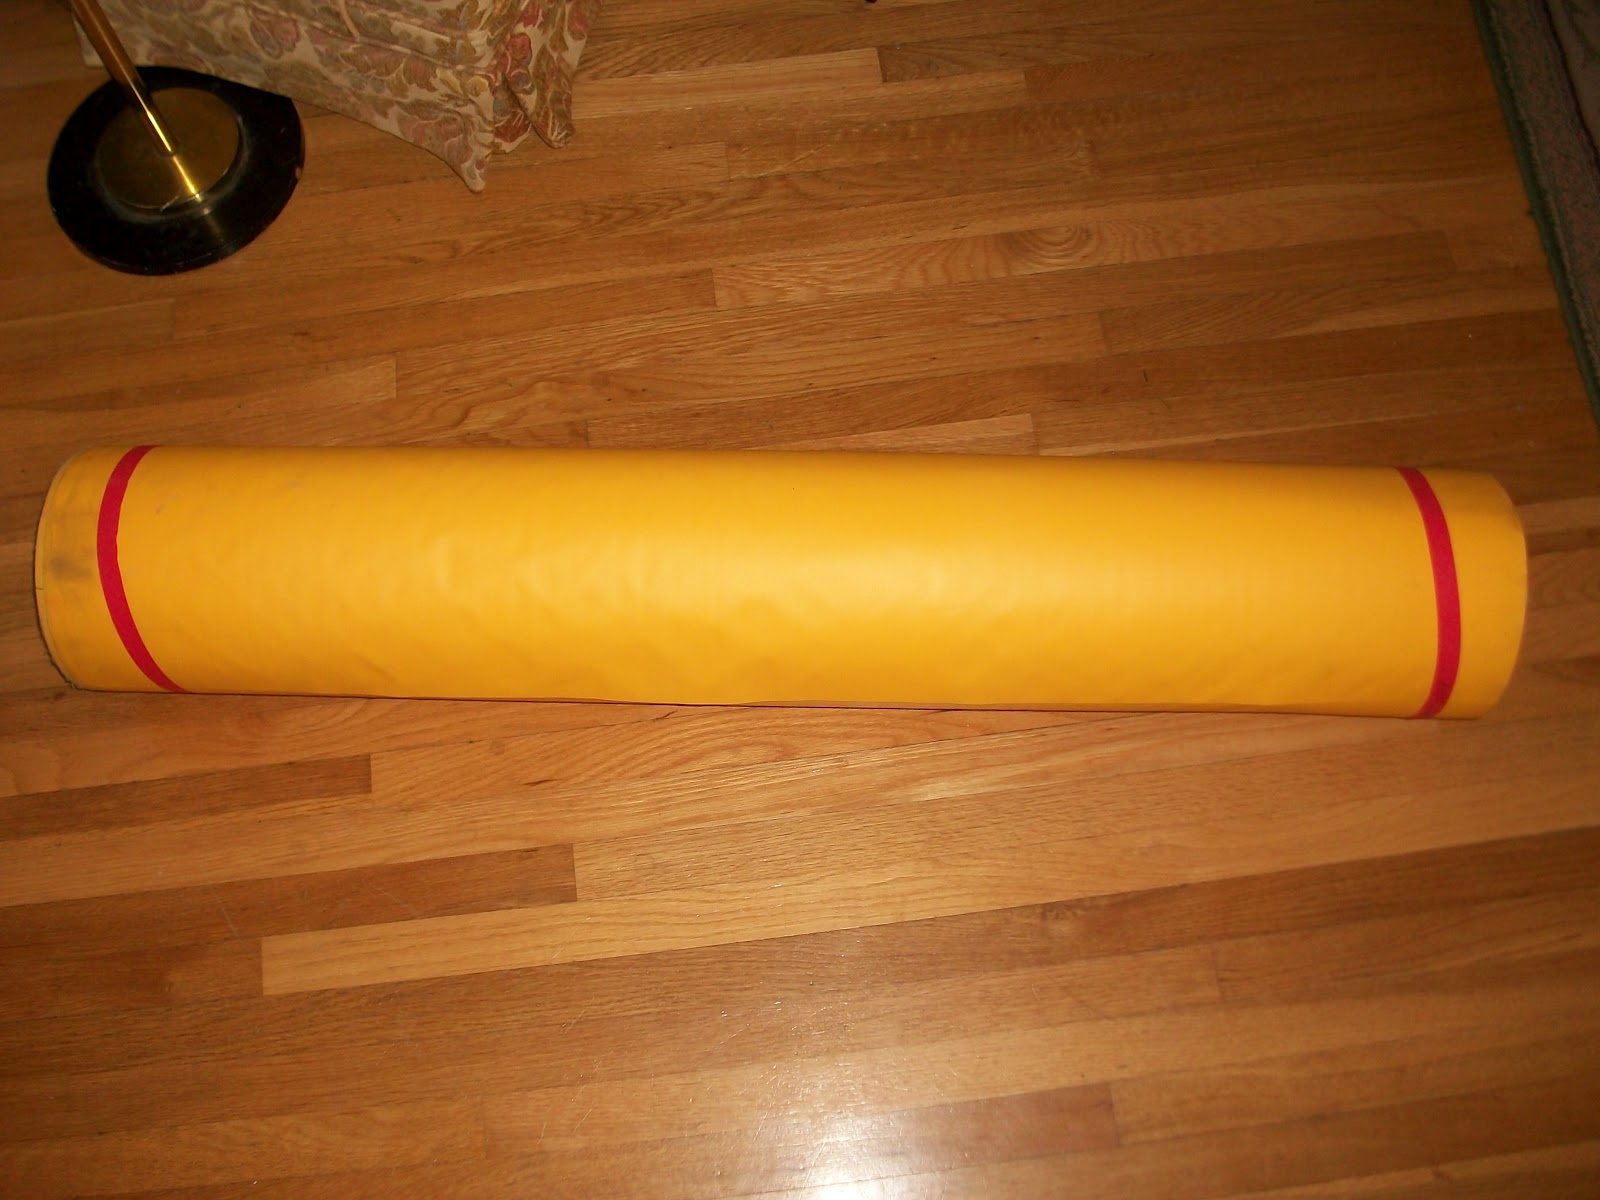
I paid ten cents a yard for 150 yards of this stuff, yep $15.00 plus tax. 

That roll weighs so much my husband had a hard time carrying it inside, and we are pretty sure it is one continuous cut, which is crazy.  It is a woven synthetic of some sort, it is bright yellow (the red stripes are just the tape holding the roll), and it is 46" wide.  I can make an entire matching encampment with this stuff!  I am super stoked.  Stay tuned for more pics and info as we start putting this baby together.  I hope to be camping in it by our big September event so I better get cracking!

Wednesday, May 23, 2012

Restless Rhymes With Rainy...


Rasberries!  I am having a twitchy, itchy, restless kind of day.  It is still raining and I can't get outside to wiggle.  I think it is time to bust out my hula hoop and have a private dance party, yep, I said it.  **sigh**  But first- I made this great top in an attempt to feel productive.


You can find the tutorial over at Her New Leaf, a fun blog about DIY and such.  It is super simple, but I will let you read the tutorial and see for yourself.  The only changes I made were to cut the neck out of a long sleeved T-shirt and cut smaller slits, then I used the described technique, and finally made a little bow out of a strip of the leftover neck and sewed that on over the beginning hole.  

Thanks to my recent stint in retail I have some icky "work clothes" and I do use that term very loosely, these are horrid retail slave appropriate, not for an actual job (sorry retail slaves).   Instead of disposing of these sad little mishappen soldiers I would like to repurpose them.  I actually have two more shirts just like this one but in green and black to spruce up later, and I am taking suggestions.  Have you done any great T-shirt makeovers?  I have lots of very rock'n'roll ones with fringe and ties and such, but I could use some more lady-like options like this.

Now, for some hula hooping